Wednesday, July 29, 2015

Lisa Peterson: A Legacy of Creativity

Is that title too pretentious? Ha, oh well if it is. It describes pretty accurately my thoughts at the moment. This post is about me and where I came from to be who I am as a sewer today.
My name is Lisa Peterson, let me tell you about my sewing family.

My Great Grandmother Ruth was an amazing person. She was born in 1903 and died in 2003.
She was a real life Rosie the Riveter! They actually specially requested her at the shipyards because she could cut a perfect circle for the manhole. Grandma Ruth would travel by train a couple hours to get to and from work and along the way she would sew or crochet. During those trips she made this afghan.
PICT0531
Her daughter, my Grandma Myrna, is also wonderful. She started having children in the mid-fifties. It was still somewhat necessary to sew clothes for your family and I've always thought of her sewing career as completely practical.

However, when I showed her this picture of the coat I recently made for my daughter, Lorelai. She became happy and reminiscent and told me about sewing blue coats for her little girls and how much she loved making them. My uncle sent me the picture of my Aunt Susan (on the left) and my Aunt Donna (right) and I think it is such a treasure.

380 bluecoats

Susan died of leukemia a couple years after this picture was taken. Donna grew up to be a very petite teen that couldn't find clothes in the department store that fit right so in high school she took to sewing all of her own clothes. At 17 she took a job at Macy's fabric department in order to facilitate her sewing and has worked there ever since.

My dad is her younger brother and learned to sew in the army during robotics training. How cool is that? His twin brother Roger is a ventriloquist and sews his puppets and their gear. Roger's daughter Emily is two years younger than me and the cousin I am closest to and easily one of my best friends and a sewing friend!
IMG_4352

Funnily enough after all that about our father's side of the family we were each taught to sew by our mothers. I love that so much.  I love that I've known how to sew longer than I can remember and I love that I am now teaching my daughter to sew. It's not a hobby it's a legacy.

Thanks Everyone for reading. I'll be back Friday to talk about what I like to sew, my routine, and sewing space. I have a blog, Banana Cherie, that I've neglected since my son was born but I plan on getting back into it. Writing this post for 52Quilters has reminded me how much I've loved blogging. There is still plenty to check out over there.

Sunday, July 26, 2015

The Travelling Quilt

Today is my last day on 52Q. I'm sad! I've really enjoyed this. But week 29 is over and now it's time to meet week 30! Before I pass the mic, I'd like to talk to you about travelling quilts.

I mentioned in my first blog post that joining the Saskatoon Modern Quilt Guild changed my life. I'm really serious about that. My confidence and skills have developed incredibly over this past year and a half. I'm so grateful to the guild. Plus they're just a bunch of cool chicks that are fun to be around.

Last September we began something called the travelling quilt. It's like a bee, except that instead of having one month where you receive 11 blocks from everyone, you send your starter block out for a year. It travels from member to member over the year, and when it comes back to you, you have 11 blocks made by fellow guild members. You pick a theme, colours you would like included, your big picture idea, whatever you need to explain your idea, make a starter block or couple blocks, and off it goes!

For example, Jaclyn's first travelling quilt had the theme 'seasons'. Whenever you got Jaclyn's travelling quilt, you were to make a block inspired by the season you got it. I got Jaclyn's travelling quilt in February, so I chose to make a Valentine's Day themed block. I made a circle of hearts (craftsy paper pieced pattern by @rightpatterns) and a heart arrow (craftsy  paper pieced pattern by @nightquilter).


My travelling quilt theme was stars. I love stars. Not just the shape, I love the stars in the sky, space in general. Anything to do with the cosmos. My husband and I are total space nerds. We have a telescope that we use to look at the stars and the moon and the planets and it's amazing. And so humbling. But I digress. I wanted my quilt to have stars all over it. But I was really busy and forgot we were starting the travelling quilt. So at 11:00 at night the day before the Saskatoon MQG meeting in which we were starting the travelling quilts, I put together this friendship star (not my favorite star block and definitely not my best work!).


Bad picture. Bad lighting. Bad block. But nonetheless I got my theme across. These are some blocks from my fellow guild members for my travelling quilt based on my star theme:


We have one month left for the travelling quilts round 1. Many other members have made me beautiful star blocks, I just don't have photos of them. I think it will be challenging to make all the blocks cohesive, but I will find a way! 

For round 2, which we started in March of this year, I think we all had a more clear picture of what we want for our next travelling quilt. This round, I asked for a block containing any of the following shapes: churn dash, flying geese, pinwheels, wonky star, plus or crosses. I wanted the background to be either low volume, or purple, pink or lime green. The shape was to be one of those colors (or low volume) as well. These two blocks were my travelling quilt round 2 starters. I'm loving what my fellow members have been doing! 


If you are part of a guild, you should consider starting a travelling quilt. It's so much fun! It can also push you out of your comfort zone in terms of color, shapes, styles, techniques. And getting out of your comfort zone is a great way to grow!

Thank you for following me for the week. Week 29 has been a ton of fun for me! If you like what you've seen this week, follow me on instagram, @graybie. Keep your eye on the #modernfabricpostcardswap hashtag to see all the beautiful postcards my swappers are making! Thanks again, have a great year :)


Tuesday, July 21, 2015

Fabric Postcards - a tutorial

Hi! So my Modern Fabric Postcard Swap is now under way. All swappers have been emailed and I have already seen some beautiful postcards under the hashtag #modernfabricpostcardswap. It's very exciting! They are very easy, and I absolutely love making them. I learned from the lovely and talented Saskatoon artist, Monika Kinner-Whelan. Monika is a thread painter and she makes the most beautiful pictures, most with a prairie theme. You can find her at http://mysweetprairie.blogspot.ca/, and you can find her tutorial for making postcards there as well. I thought I would give you a run-down on how I made mine, just for fun!

It is so incredibly simple. You need only the following things:

  • fabric scraps
  • a 4x6" piece of double-sided fusible stabilizer
  • a piece of white or light fabric cut slightly larger than 4x6"
  • thread
  • a piece of parchment paper (for ironing)
So let's get started. I cut out a bunch of green scraps to make a green patchwork postcard.


I then chain-pieced them together.


Once I had them all sewn together, I squared up my postcard front, and then ironed it onto one side of the double-sided fusible stabilizer. I was horrified when I saw this photo after the fact. I NEVER iron on my cutting board!!! Don't do that. It's bad. I also forgot my parchment at home, so that's another bad.


After the postcard front was on the stabilizer (never iron on your mat and always use parchment!!) I quilted the postcard front. You may use whatever colour you like on the front, but make sure you use white or light thread in the bobbin, so the lines are less visible through the back fabric.


Next I ironed the white fabric to the back. I bought fabric postcard kits from Monika, and she has this nifty stamp that she puts on the fabric for the back. I love how it looks. You can buy her kits from her Etsy store. If you want to do this all on your own, you simply need to draw the vertical line in the middle of the back fabric, write POSTCARD on top, and add some address lines on the right. It works just as well.


Once the back of the postcard is on, you can trim around the edges to square them up. Then zigzag or straight stitch all around the postcard. When I zigzag, I shorten the stitch width and length. I like it tight.


And voila! You have yourself a handmade, fabric postcard! Super easy, super adorable, and how amazing would it be to get one of these in the mail?!! Monika also has a tutorial on her website on how to frame your postcards. Because they are, after all, little works of art.


Important things to remember:

  1. Do not use lace, or beads, or anything that hangs off or sticks out. It can get stuck in the sorter and wreck your postcard.
  2. Use light thread in your bobbin to quilt the card.
  3. Use your imagination! The possibilities really are endless for fabric postcards.
  4. Use a sticker stamp when possible. They stay on better.
  5. Don't put it in an envelope to send! Put the stamp directly on the postcard and pop it in the mailbox!!

Now go on, get making!!! And when you do start making these, post them with the hashtag #fabricpostcards and/or #snailmailrevolution so we can see them and be inspired!

Post by Tarra - Week #29: 

Tarra is a chemistry and genetics instructor who has been quilting for two years. She is also a knitter, crocheter, embroiderer, and dabbles in garment sewing. She lives in Saskatoon with her wonderful husband, two amazing kids and a cute Weimaraner. Tarra tries to be as natural as she can in life, but loves chocolate, wine, and has a dangerous fabric addiction. Follow along on Instagram at @graybie.

Monday, July 20, 2015

Week 29 - Tarra McCannell: Who IS graybie??

Hi! I am your host for 52 quilters for week 29. I must say, I could not ask for a better week to be hosting. It is hot, I am on holiday at our cabin with my adorable kids. It's perfect!

My name is Tarra McCannell. My maiden name is Gray. I have had the nickname Graybie for longer than I can remember. I am an avid (some might say obsessed) knitter, crocheter, embroiderer, quilter and sewist. I have been knitting for pretty much all my life, and stitching here and there. I started quilting 2 years ago, but really got into it when I met my Saskatoon quilties Sheila, Jaclyn, Sonya and Lisa in 2014. We're all in the Saskatoon Modern Quilt Guild. It's changed my life.

Where do I begin? There's so much to tell. I am originally from Winnipeg, Manitoba. Don't listen to people who say it sucks. I love my city. I miss living in my city. I go back any chance I get. I have lived away for a long time now though. I lived in Canmore, Alberta for 2 years after doing one year of university. I was a lifty at Sunshine Village and snowboarded every day. It was fantastic!

I moved to Victoria and did an BSc Co-op degree in Biochemistry and Microbiology. My co-op experience took me to New Zealand where I worked for a year and then did a Master of Science in Biological Sciences. This is me on my 29th birthday, celebrating with my kiwi family. Not family by blood, but still family.


Here I am hosting a stitch and bitch night with some work friends in NZ. I taught about 6 people to knit and we had knit nights every Thursday for quite a few months.


I met the love of my life on a plane home from New Zealand at Christmas time in 2005. He lived in Hamilton - the same city I lived in!! We were both heading home for Christmas, on the same flight, and sat next to each other. We always say we had 3 dates on the flight home. We had two movies, dinner, breakfast and lunch. We started dating when we were both back in Hamilton. Then AJ left to go travelling in March 2007. I met up with him in Thailand in June for a month. That's where this photo was taken.


I finished up my Masters and moved to Saskatoon in March 2008, where AJ was living. I got my dream job, a puppy, and married in the summer of 2009.


I am a teacher at Saskatchewan Polytechnic (formerly SIAST) in the BioScience Technology program. I teach General Chemistry, Analytical Chemistry and Molecular Biology. It is the best job ever! It can be very challenging, but the summer off helps me to recharge.

I have two beautiful, brilliant children. Alaina is 4 and a half. She is spunky, sweet, kind, caring, loving and, in my completely unbiased opinion, incredibly smart.

Gray is my baby. He will be 2 at the end of September. He is so sweet, so cute, but already so stubborn. I feel lucky to have such loving children. Maybe it's because I smother them in hugs and kisses every, but they are fantastic cuddlers.


I have been crafty all my life. I knit hats and mitts for all my friends starting in high school. Later on, when friends started having babies I would always knit up a blanket or a sweater for the newest baby. I sold stuff in a few craft shows here and there. My favourite one to sell in was the True Knit Art Show in Regina, SK. I was in that 3 times. My absolute favourite handmade show to go to is the Flock and Gather Handmade Market here in Saskatoon. We have some incredibly talented artists here. I always make a point of going to their spring and winter shows.

The Saskatoon Modern Quilt Guild, as I mentioned, changed my life. I met super cool quilters, who opened my eyes to things I hadn't seen before. I signed up for my first swap last year - the Schnitzel and Boo Mini Quilt Swap (round 2). I had very little experience doing anything other than squares and stitching in the ditch. I got the lovely, talented Jeliquilts (Kelly Liddle) as my first partner and had no idea what to do. I had no modern fabric, and no clue how to make anything other than squares. This is what I made for Kelly.


Not super technical, but it was very different for me and I enjoyed doing it. From then on I was hooked on modern quilting. I won't post any more right now, but I am in several bees, the Canuck birthday club, and have been in several swaps since. I love being a maker. I can't imagine not creating.

I hope you enjoy following me through a week in Cochin, Saskatchewan, as I chill with my kids, knit and sew the summer nights away!


Post by Tarra - Week #29: 

Tarra is a chemistry and genetics instructor who has been quilting for two years. She is also a knitter, crocheter, embroiderer, and dabbles in garment sewing. She lives in Saskatoon with her wonderful husband, two amazing kids and a cute Weimaraner. Tarra tries to be as natural as she can in life, but loves chocolate, wine, and has a dangerous fabric addiction. Follow along on Instagram at @graybie.

Sunday, July 19, 2015

Rae's Quilt Block and some Final Thoughts

I wanted to spend some time talking about creating an applique pattern. Anything that you can draw can become an applique pattern. My original Succulent Garden quilt was drawn out on 4 sheets of printer paper that I taped together.  I used that one drawing as the pattern to cut out all of my applique pieces. You don't have to use anything fancy or be a computer savant to create your own pattern.

Once I decided that I wanted to share my pattern here on the blog, I knew I'd need something more sophisticated than my hand drawn cacti to offer to you. If you have access to Adobe Illustrator please use it It will digitize hand drawn designs from a cell phone picture. Unfortunately for me, my computer is from the dark ages and won't run Illustrator. Instead, I used Quilt Canvas to create my pattern. Quilt Canvas is a paid service, but they offer 48 hour passes for $4, which is what I used to create my pattern. If I ever decide that I need to edit the pattern it's not a problem. Quilt Canvas stores my work in my profile even when I don't have an active paid subscription. Quilt Canvas offers lots of the same options as EQ7, but is online based and I don't have to commit to purchase. I don't know that I'll use the program for a lot of things, but it was certainly helpful in creating the printouts for this pattern.

As a contributor to 52Q, I'm expected to create a quilt block that represents my time here on the blog. While lots of things could represent me as a quilter, I think that only some applique cacti really speak to the work I've done as a member of the 52Q family.

First, I cut pieces of paper to the desired final block size (8.5x8.5)


Next, I spent some time creating my applique design. Don't be afraid to draw lots of different variations of the same idea.


Then I took a marker and outlined my design so I knew exactly what I needed to trace onto my fabric.

After that I picked out my fabrics, transferred my design to each piece, cut them out and laid them out on my paper template.

these are actually laid out on the fabric base, but you get the idea
I just love how twee these little scraps are!
Because I'll be attaching this applique to a single piece of fabric and not a quilt sandwich I added an iron-on, tear away embroidery stabilizer to the back of my base piece. If I were making an entire quilt of pieces like this I wouldn't tear away the stabilizer until I've joined my blocks together...just like with paper piecing.


Then I glued each applique piece to the fabric base with my glue pen, put some navy thread in my machine, brought the bobbin thread to the front, and used my darning foot to stitch around each piece.

Oops, I deleted the stitching picture :( But here's a picture of what the block looks like after stitching is completed and all the threads are still on the front of the piece.


Next, I knotted my thread ends, threaded them through a hand needle, and pulled them to the back of my block.


Here I knotted the thread ends again and snipped them off close to the back of the piece.


My completed block back with the stabilizer still in place:


And the completed applique block front :


If you decide to create your own applique pattern, tag me in a pic on IG so that I can cheer you on and drool over your awesome designs.

Some final thoughts:

I really believe that we should love the creative process as much as the finished product. Only make things when the making brings you joy. Don't get mired down in creating the next big craze. If you don't love hand sewing, maybe the Millifiori isn't for you. Yes, they are gorgeous quilts. But will you end up resenting the time you spend working on it because it isn't something you love to do? Possibly.

Now, I'm not advocating for never trying anything new. Not at all. I'm just giving you permission to abandon projects that aren't bringing you joy. Life is way too short. I know that I will never work though my personal quilty bucket list. I'm not going to waste time working on a project I've grown to dislike simply because I started it.  Put it away, re-purpose it as something else, destash it, or gift it to a quilty friend who loves that kind of project. Whatever you do, don't allow the idea of a finished project shackle you to working on something that saps your joy.

I am so thankful for the week that I've been able to spend with you. I released my very first pattern (Eeek!!), I got crazy sick, I took you on a trip to the Fort Worth Modern Quilt Guild meeting, and I was honest about who I am and how I like to create. If you want to keep up with me and my crazy antics, you can follow me on Instagram and Twitter @jrshules and my personal blog Rae's Making It. Thank you for following along. I can't wait to see what Week 29's quilter has in store for us. See you all out on the interwebs!!


Post by Raeann - Week #28: 

Raeann is a wife, mom, nerd, nurse, and obsessive creator from Fort Worth TX. She loves reading, wearing glasses, and Nathan Fillion, hates mosquitoes and waiting for Sherlock to return, and is hopelessly addicted to social media. Follow along on Instagram at @jrshules.

Saturday, July 18, 2015

Succulent Garden, Part 2

I apologize for the delay in getting this blog post up. The McIntosh girls have all been inflicted with the most heinous cold in recent memory. This has led to a dramatic decrease in productivity and a general moodiness amongst the ladies that may cause the hubster to revolt and retreat. We did manage to go out for a breakfast/movie date this morning without complaining or bloodshed; so things may be looking up.

Also, this:

I totally stole this from @andiejohnsonsews, my new IG BFF

I believe we left off with our applique pieces cut out, waiting with baited breath to find out how we were going to attach them. No? Maybe that was just me.

I want to point out that this is just my way of doing raw edge applique. It's definitely NOT the only way. It's probably NOT the "right" way. It just the way I like to do it so that I end up with the look I want. If it's not for you, that's totally OK. I want you to create something that YOU love.

Take you applique pieces, remove your markings per manufacturer's instructions and set aside. Now choose a background. It could be a piece of solid fabric or some patchwork...whatever you choose. I took a half yard of some crazy soft, light blue shot cotton, cut it into fat quarters, placed some cotton batting in the middle, smoothed it out and pin basted just around the edges.

"Just around the edges?!?", you say? Yes. Because I plan to essentially free motion quilt my pieces directly to the quilt sandwich, I won't pin the center until my applique pieces are in place. Alternately, you could quilt the entire base prior to attaching the applique pieces.  If so, use whatever basting method you prefer and quilt away. I chose this method when I want to be sure that my base quilting pattern lines up exactly on all sides of the applique.
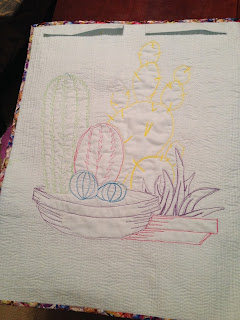
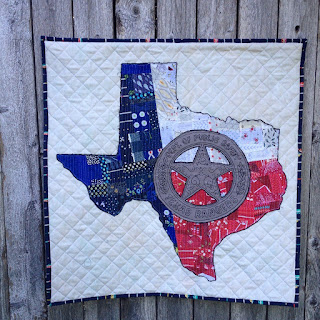
like on this quilt

Now, lay out your applique pieces to your pinned quilt sandwich. Feel free to fiddle with it until it sits the way you like it. Don't be scared to pull all the pieces off and try again. This is part of the fun. It's like doing a puzzle with beautiful fabric. It's ok to pet your fabric. You'll have to make some things overlap more than others (specifically, the Bowl 2 Bottom piece is a tad bit longer than it needs to be....just scootch it further under Bowl 1 Bottom and it will be fine).


Don't be afraid to trim pieces here and there if they're not lining up the way you want. I didn't like the bottom line of my Cactus 3 so I trimmed it. Also, a small corner of Cactus 5 was peeking out from under my Soil piece, so it got snipped.


Once your pieces are sitting where you want them you can start gluing them down. I used a Sew Line glue pen this time, but I also use regular craft glue sticks and sometimes even Elmer's school glue. It just depends on what I have handy. Use small amounts of glue. I don't plan on washing my mini, so any glue clumps may be seen in the finished work.

I like to fold pieces back and glue either the piece itself or the quilt top. It doesn't really matter. Play with it and find what works for you. Don't be afraid to pull of a glued on piece and reposition. As long as you are using small amounts of glue, nothing in this step is permanent.

After you have your pieces glue tacked into place, place a pin in some of the larger pieces to baste the center of the quilt.


Now we get to start the quilting/applique attachment. Attach your darning (or free motion) foot to your machine. Position your quilt under the needle and bring the bobbin thread to the front. I like to start in a position where I'm worried about shifting so that I know it gets secured first.


This is probably a good time to talk about why I don't use fusible web to secure my applique pieces. First, I don't like the stiffness of the fusible web. Unfused fabric, even when glue tacked into place, will shift ever so slightly while it's being stitched down. This create puckers and bubbles and texture that is glorious in the finished quilt. I just love it. Second, the stiffness of the fused fabric can become very difficult to stitch through when you're sewing several layers of fabric together. Almost all of my applique designs require layering 3 or more fabrics over one another to create an image. My craft store sewing machine just doesn't have the heft to get through all that fusible web and the quilt sandwich too.

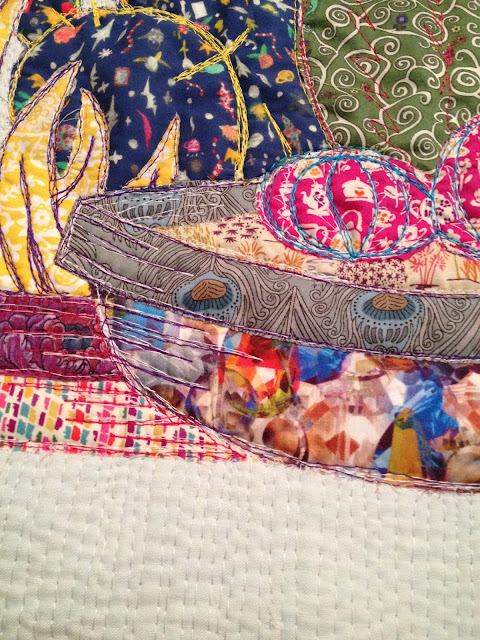
Sherlock's layers would have been near impossible if fused
Now, simply stitch around the edge of each piece to secure it in place. Here I secured all the pieces with a neutral thread and went back and added detail quilting in contrasting thread. In my original Succulent Garden quilt, I secured each piece in the contrasting thread and added the detail as I went.


Don't be scared to stitch over a line more than once. The edge quilting should look like a sketch. Going over a line multiple times thickens the line and makes it easier to see. Also, don't rip out lines that are slightly wonky or that run off the edge of the applique piece. Life is too short to rip out quilting. Simply add another line or four of stitching and pretend that it was intentional.

Take the line edging the bottom of the soil out to the top corner of the bowl top to create the rim.

I made my detail quilting in the cactus pieces jagged to invoke spikes and thorns. Experiment and find something that works for you.


After all the applique pieces are secured, fill in the background quilting. I chose to use a dense, free form matchstick quilting. This gives the background a solid feel which allows the puffiness of the center applique quilting to really stand out. I did not use a walking foot for this step. I like the organic waviness the matchstick quilting has when done free motion.


Once your quilting is done, trim or bury all thread ends, square up the quilt, bind and enjoy.  Oh, and don't forget to take pictures and tag them with #52Qsucculentquilt so that I can ohhh and ahhh over your fabulous creation.


I really love this technique for working on mini quilts. It allows me to go from idea to completed project in as little as a day. However, there are some drawbacks to this technique. Notably, that your applique quilting will be seen on the back of the quilt.

Baby got back!
 For a quilt that hangs against the wall it isn't really a big deal. If you were to use this technique on a larger quilt you would have to decide whether or not you could live with a backside that isn't uniform. Also, the dense quilting used to create the detail on the applique pieces could render your quilt stiff in those areas. Just something to think about.

So that's it. That's the way I create stuff. It's messy, it's imperfect, it's 'fly by the seat of my pants', and it's totally me. Give it a shot and see if you like it. I promise I won't be upset if you don't. If you decide to give this a go and something isn't working for you, shoot me a message over on my personal IG @jrshules. I'll do my best to help you through it. You could also change it up and do it in a completely different way that works for you. The thing that matters to me is that you have fun creating something that you love.


Post by Raeann - Week #28: 

Raeann is a wife, mom, nerd, nurse, and obsessive creator from Fort Worth TX. She loves reading, wearing glasses, and Nathan Fillion, hates mosquitoes and waiting for Sherlock to return, and is hopelessly addicted to social media. Follow along on Instagram at @jrshules.